Pages

Tuesday, March 26, 2013

What Have We Been Up To?

Wow, lately we've been slacking a bit on the blog updates. I'd like to say there was a good excuse for not posting in the last two weeks but, the truth of the matter is that we really haven't had much to talk about. We took a break from making changes to the house for a couple of weeks.

Two weekends ago, we celebrated St. Patrick's Day by going on a brew crawl in downtown Pleasanton which was a ton of fun! Because Pleasanton doesn't really have that many bars, 27 of the local businesses opened up their doors for the brew crawl and they each served a different type of beer along with a snack. We've been meaning to go to downtown Pleasanton to explore since it's so adorable so this was the perfect opportunity to see all of the cute little shops. We also went our ring bearer's 2nd birthday party, and wine tasting in Napa! It was a busy weekend but so much fun.

Last Saturday, we bought a table lamp for our nightstand from Cost Plus World Market. CJ and I like to read in bed at night before going to sleep and we always hated having to climb out of the warm bed to shut off the lights, so having a lamp in arm's reach is pretty amazing. Not to mention, it's extremely adorable. I'll post a picture of the lamp soon, just need to upload it from my camera. Next up for our bedroom - picking some photos to frame and hang above the bed. I think it would be nice to use some of our wedding photos.

Last Sunday, we worked on cleaning up the backyard, the front yard, and scrubbing down the entire house. We also FINALLY found an entertainment center to house the millions of cords and electronics that have been living on the floor for the past month. It's been driving me nuts to see all the clutter sitting on the floor so I can't wait for it to be delivered!! Our furniture guy told us that it will be delivered this week, woo hoo!

Our new entertainment center!
Once we have that delivered, we're going to pick out some curtains to hang up on either side of the fireplace. That will soften up the area and hide the outlets that are in random areas of the wall.

Sunday, March 10, 2013

Bridal Bouquet Project

My beautiful bouquet
After our wedding, I did a bunch of research on what could be done to preserve my bridal bouquet. There are plenty of companies that do some sort of bouquet preservation technique to freeze dry it so it looks exactly the same as it did on the day of the wedding (for a shadow box or dome), or press the flowers and frame them. Unfortunately, I started doing this research a week or so after the wedding because it didn't even occur to me before the wedding. If you want to do one of those preservation techniques, you need to ship off your bouquet within a day or two of the wedding to ensure that it can be properly preserved. So, you should contact the company way before the wedding to see what needs to be done. Some companies need to ship something to you before the wedding to put the bouquet in so it doesn't get damaged in shipping.

I decided that I would just press all of the flowers and then try to do something with them when they were all flattened out. I pulled apart the bouquet flowers one by one and placed them in CJ's college textbooks (glad we could make use of them one more time!). Once they were all put in the textbooks, I weighted them down with a ton more books to make sure they were as squished as possible. Then, I just left them there for several months.

Last weekend, CJ and I were running a bunch of errands and decided to venture into HomeGoods for the first time. As were were wandering down one of the aisles, we spotted the perfect shadow box for my flower project and it was only $12.99! I was sooo excited to bring it home and get started on my bouquet project.

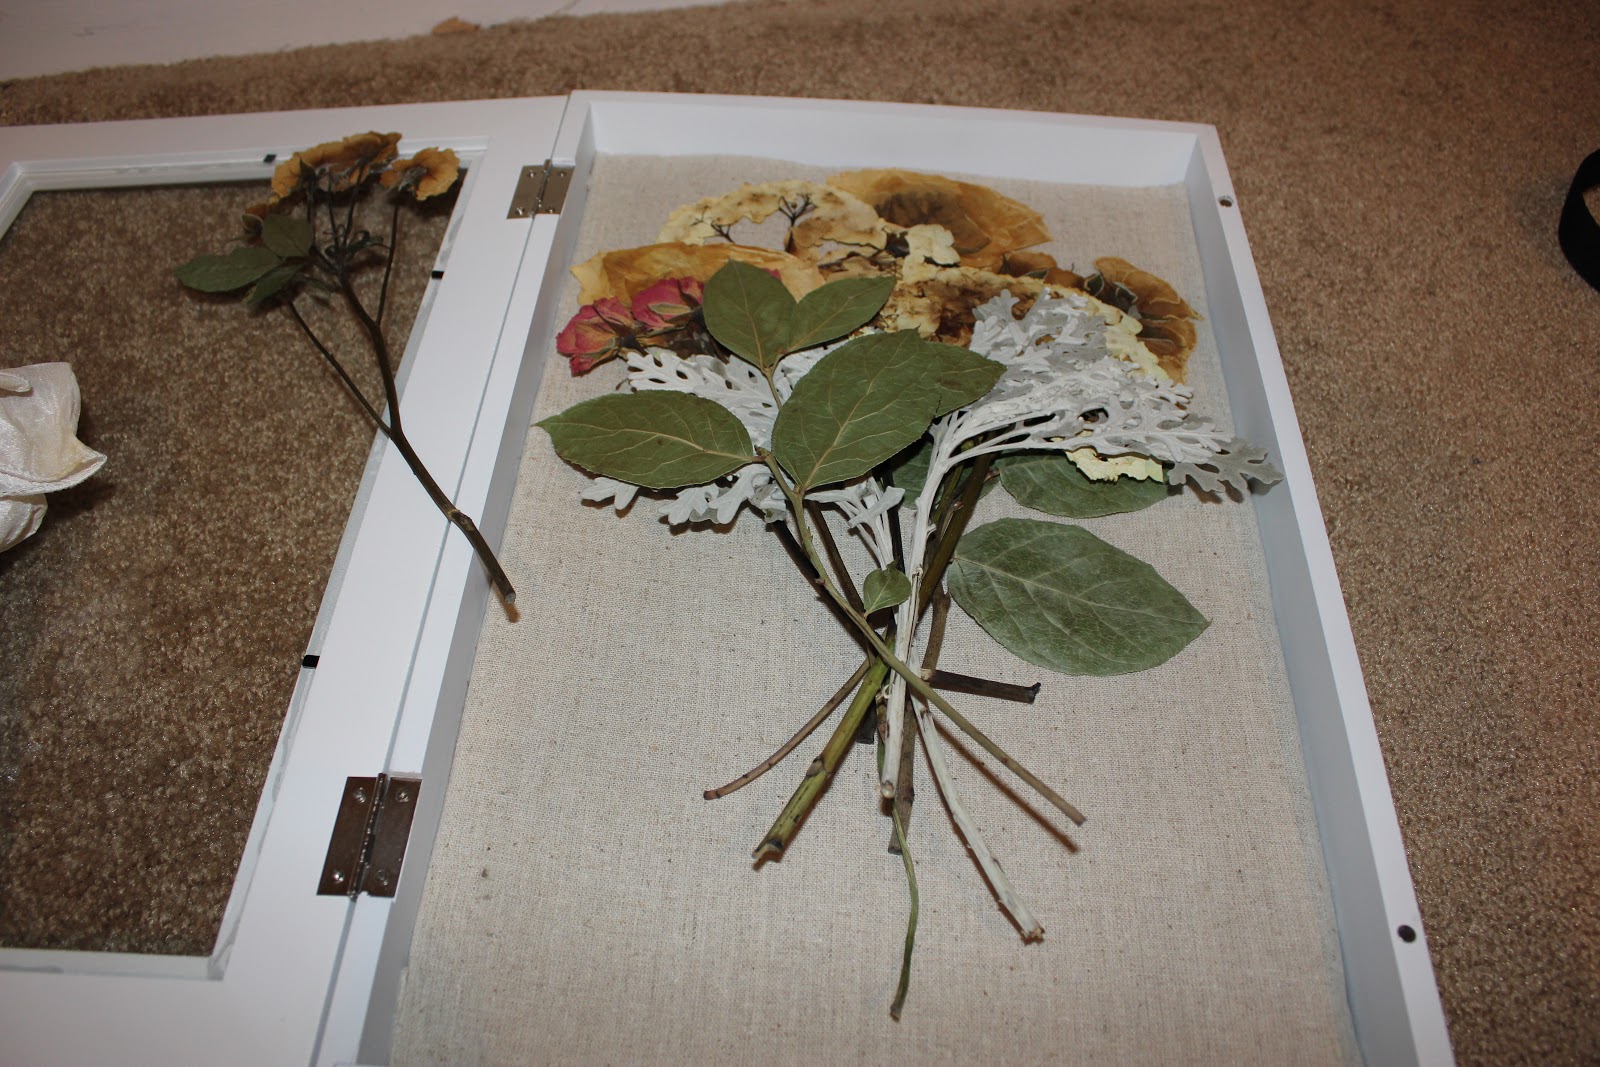
When we got home, I took out all the flowers from the textbooks and started to place them in the shadow box to see how I wanted them to look.


I also rewrapped the fabric from the bottom of my bouquet so it was nice and neat.


Once I got the flowers where I wanted them in the shadow box, I laid the fabric base on top of the stems of the flowers and started pinning the base into the cushioned shadow box backing. Luckily, I had some extra pearl pins from my bouquet and the shadow box came with about a dozen of them. I kept pinning the fabric until the base was as flat as it could be and then lifted it up to make sure nothing moved. I closed the front of the shadow box and, VOILA! I was done.


Super easy project and it looks so professional. I've already had two people tell me that it looks like I bought it from a store. :)

Sunday, March 3, 2013

Master Bedroom

Last week was a busy week at work and at home so we took a little time off from blogging to rest. This weekend was quite productive and we're really proud of the progress we've made.

Here's a few things that we were able to check off our list:
  1. Hang the curtains in the master bedroom
  2. Wash, iron, and put on the guest room bedding
  3. Make a shadow box of my bridal bouquet (saving this for another post)
  4. Bought an adorable centerpiece for our kitchen table
  5. Increased our internet speed (it's been extremely slow the past week so CJ spent many hours on the phone with Comcast trying to fix it)
  6. Organized the garage
  7. Parked our car in the garage for the first time!!
  8. Unpacked a few more boxes
We're still looking for furniture for the formal living room. We haven't quite found something that we're madly in love with that's also a good price.

We're pretty excited about how the curtains look in the bedroom, it totally makes the wall look more interesting and we're happy to have all the curtain rod supplies off the floor and off our dresser.

Here's what the window looked like before (excuse the temporary blinds, we haven't chosen blinds for the house yet but these are still pretty nifty):


And here's what it looks like now, so much better!


We bought the curtains at IKEA for a great price (can't remember what that was right now) and we bought the curtain rod from Bed, Bath, & Beyond with one of our gift cards that we received from the wedding. It makes the room so much more inviting and cozy, we love it.

Here's a few more shots of our bedroom:

Our adorable "T" pillow and bedding from Pottery Barn

Shot of the window, bed, chest, and cozy rug for our feet
We have several more things to do for this room before we consider it done. 
  1. Shorten the curtains a bit
  2. We want to print some of our wedding photos for the walls and get some nice artwork as well. I take forever to decide what to hang up and where to hang it so who knows when that will happen. 
  3. Get a lamp for the nightstand
  4. Some type of decorations to put on the chest
That's all I can think of right now but I'm sure there will be more added to the list.

One of our engagement photos on the nightstnad


Wednesday, February 20, 2013

The Big Reveal

The time has come!! We're ready to share the official before and after photos of our kitchen. After it being such a long process, we are so incredibly happy with the final result. It truly is our dream kitchen (and home).

When we first compared the before and after pictures, we were soooo amazed! Of course I remember what the kitchen looked like when we bought it but comparing the before and after makes it's hard to believe that they are the same house.

Click on the photo to make it larger.
Pictured on the left: Our kitchen on December 11, 2012
Pictured on the right: Our kitchen TODAY :)

Everything in the kitchen was chosen by us. We picked the stain and style of the cabinets, hardware (knobs and handles), appliances, floor stain, recessed lighting, backsplash, etc. When you're picking a bunch of individual items, it's really hard to imagine what it will look like when it comes together and it's stressful because you want to make sure you've made the right choice. We spent a lot of time on Houzz looking at example kitchens and figuring out what we liked and didn't like.

Here's another view of the kitchen:


One of my favorite parts, we have a little heart in our hardwood floors!


Have you ever remodeled a kitchen before? Did you experience any setbacks? What's your favorite part?

Monday, February 18, 2013

All the Juicy Details

Home Sweet Home :)
Prepare yourself for a novel. We decided to keep track of the ridiculousness of our house process and talk about it after it was over... so here's what we went through.
Our kitchen when it was under construction (and the termites were discovered)
  1. From the date of our offer to the closing date, it was a little over 3 months. According to our realtor, this was the longest closing he's ever experienced. It started with it being an estate sale so we had to wait for the probate court date which ended up happening two months after we put in our offer. The original court date was scheduled for a month after but the judge got reassigned so instead of them just letting the hearing happen, they rescheduled it for a month later.
  2. We were preapproved and underwritten at the time of our offer, but because it took so long, we got reassigned a new underwriter who was just out of training. Because of that, the whole process started over again and took 3 weeks to close when it was supposed to take 2 days.
  3. We started work on the kitchen and discovered termites. The home inspection company missed it so they offered to pay for the mistake but it would have been nice to know that beforehand. 
  4. Someone, we don't know who, called the building department on us and because of that, we got "redtagged" and doubled the construction time. We then had to file for a permit and go through several inspections to get approval on the work. Someone really had to have no time on their hands for that to happen because they have to jump through hoops to file a complaint. The craziest part was that we weren't even at the stage where a permit was required.
  5. Our contractors showed up to the house one morning and the garage door was wide open. All of our kitchen appliances were still in the garage but that gave us a heartattack. What they think happened is that, since it's an old garage door opener, that someone has the same code as us. My dad said that sometimes one of my parents old garage doors used to spontaneously open so it could have been that too. Needless to say, the door got bolted down and the garage door opener got replaced.
  6. We had an island built for the kitchen and then decided to get rid of it. After bringing it into the kitchen, we realized it was just too big for the space and instead had the cabinet guys build a china cabinet. It was a good hiccup because we absolutely love the new cabinet.
  7. Our contractor opened up the wall in the back room for the TV mount and found more termite damage. Luckily, there weren't any live termites so he just replaced the damaged wood and continued on. CJ, on the other hand, had to take apart the brick planter box in the backyard that was built against the perimeter of the house. We also called the home inspection company one more time and complained about them not finding this either, so they offered to spray the entire house for free. 
  8. Our heater broke. From the time that the heater broke to when it was fixed, it took 2 weeks. It got so cold in the house when we walked in that we could see our breath. It also delayed the floor refinishing process by 2 weeks because the wood was too cold to get finished. We had to let the wood heat back up after it was fixed so that all the moisture was out of the wood. If we didn't wait, there was a possibility that the hardwood would bow in the future.
  9. Our heater "broke", again. After the motherboard was replaced, it started working just fine. Unfortunately, a couple weeks later the heater started making weird noises when it turned on and would shut itself off after a minute or so. After having the technician come out again, he found that the filter was so clogged that the heater couldn't take in air which is why it was shutting itself off. So, luckily it just required a new $7 filter and we were back in business.
Moral of the story is nothing ever goes as planned so you just need to find the silver lining in everything and learn to enjoy the process because, in the end, it will look beautiful and it will all be worth it.


Sunday, February 17, 2013

TV, Couches, & More!

Our entertainment/family room (we can't decide what to call it) is slowly coming together! Our TV was delivered early last week and installed at the end of this week and it's AMAZING! It's 55 inches of pure beauty and fits perfectly above the fireplace.

On Valentine's Day, our couches, coffee table, and side table were delivered and it finally feels like a room. The furniture fits in the room so perfectly and looks amazing!


We're going to get blinds for the rooms but need to decide which kinds so we've thrown these $5 blinds up over the windows in the meantime. Those blinds are a lifesaver so if you ever move into a house and don't have any blinds, go to Bed Bath and Beyond (or even home improvement stores like Lowe's) and you can find these for $4.99. We were stressing out over what curtains to buy for our front room because we needed to cover up those windows before moving our belongings into the house but my mom came up with the genious idea of sticking these up onto the windows and Voila! our windows are covered and we can take more time to pick out the curtains we love.

The coffee table is super functional because it has 2 drawers for us to store items in. That was CJ's top requirement for the coffee table and I'm glad he was so insistent upon us finding one with drawers because it's so useful!

Another view of the coffee table so you can see the drawers

The "To Do" list still has several items left before we feel like this room is done:
  • Couches
  • Coffee Table
  • Side Table
  • TV
  • Colorful pillows for the couches
  • Curtains for either side of the TV (this will cover up the plugs to the side of the fireplace and make the wall more dramatic)
  • Blinds
  • Artwork
  • Entertainment Center (so we can remove the cable box, Wii, Xbox, and DVD player from the floor)
  • ... and then any other decorative items that we like for this room :)

Saturday, February 16, 2013

Closet Organization

As many of you already know, one of our first items that we wanted to have done before moving in was expanding the size of our closet. Not because it was the highest priority, but because it involved breaking down walls which would affect our hardwood floors. Since we were redoing the hardwood floors along with the kitchen, we figured it would be best to do the closet too otherwise you would see the funky line in the closet where the wall used to be and that just wouldn't be acceptable. So, we proceeded to have it expanded to take over half of the guest closet and now it's L-shaped.

We had NO idea how to organize a funky shaped closet so we decided to research companies that did free designs. The first company, EasyClosets.com designs beautiful (and very expensive) closets and will do it for free. So, we measured the closet, submitted our dimensions along with our "wish list" (aka we want X inches of space for long hang, we have X amount of shoes, etc.) and they got back to us with a design the following day. It wasn't that impressive and was way too expensive so we looked at a few more options.

Since I've always loved The Container Store, we decided to stop by there and see what they had to offer. After wandering the store a bit, a lady approached us and offered a tour of their example closets and then a free design. She said that at the end of the tour, the attendees of the tour would be thrown into a raffle to win a $25 gift card and, turns out, we were the only 2 attendees so we automatically won! Yay for us!

She did the free design and we loved what she came up with, not to mention it was 1/2 the price of EasyClosets so that was also a plus. We ordered the supplies from them, picked it up (which saved us the delivery fee), and then scheduled a time for them to install it. If you have a standard closet size, it's fairly easy to install it yourself but since our closet is a funky shape and size, they recommended we have the professionals handle it because the materials needed to be custom cut.

Here's what the closet looked like before the sliding doors were added and the Elfa closet. Notice the beautiful white walls that Lauren and I painted.


On Monday afternoon, the closet installation guy came over and transformed our closet. It looks sooo amazing and is SO functional. We absolutely love it. There are 3 shoe racks, one of which can fit 9 pairs of heels that pull out like drawers. I'm obsessed! All of our hanging clothes fit in there perfectly so now we just need to figure out what to do with all of our folded clothes. :)

View with the right sliding door open

View with the left sliding door open

Of course, my heels had to go in first :)
These open up like drawers and the top shelf can hold 9 heels, the lower shelves can hold 4-6 pairs.